


Have you ever wondered how a chatbot assistant works when you’ve visited a website that uses one?
Well, in this article I’m going to be showing you how to build a chatbot assistant using Dialogflow. And the best part? We are going to be doing this with React. We’ll go over what Dialogflow is, explain its various components, and integrate it with a React app.
By the end of this article, you’ll have a functioning Dialogflow chatbot assistant, built with React, to add to your portfolio. Yay!!!
You can clone this project from my GitHub, please leave a star if you like it.

Prerequisites
To set up our Dialogflow chatbot, we will need the following:
A Gmail account (this will enable us to create a Dialogflow CX agent)
Access to Google Cloud
But first, let’s find out what Dialogflow CX is…
What is Dialogflow CX?
Dialogflow CX is a conversational AI Platform, CAIP for short, used for building conversational UIs. It can be used to implement several types of virtual agents, such as voice bots, chatbots, and phone gateways, and the best part is that it supports over 50 different languages.
Now that we know what Dialogflow CX is, let’s set up our environment.
Setting up our environment
The first step is opening up a Google Cloud Project.
You’ll be asked to sign in, and if you have a Gmail account, log in with your credentials. After that, you’ll be redirected to a dashboard.
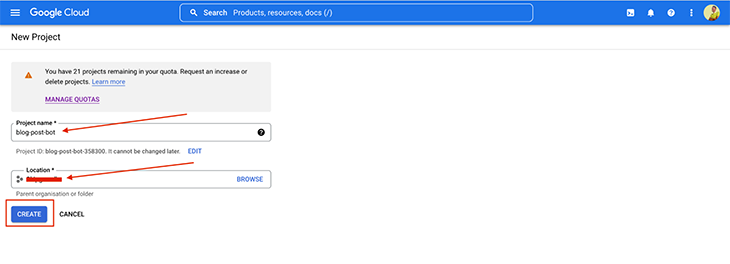
Next, click on CREATE PROJECT.
After that, we have to enter the project name. In our case, we’ll use blog-post-bot.
The second thing to choose is the parent organization, then click CREATE:
After that, you’ll see a dashboard similar to the below image:
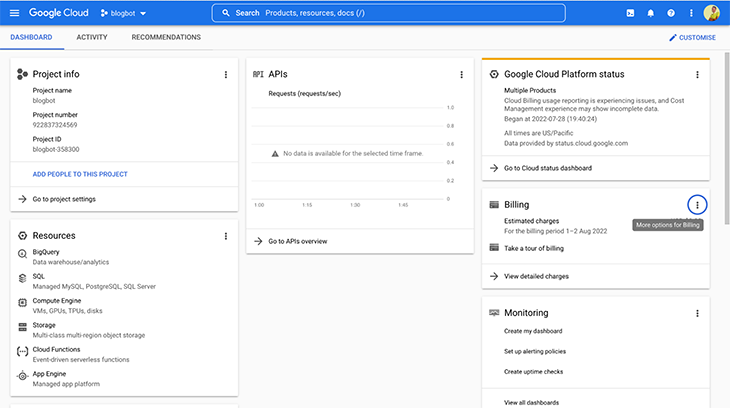
Now let’s enable the Dialogflow API.
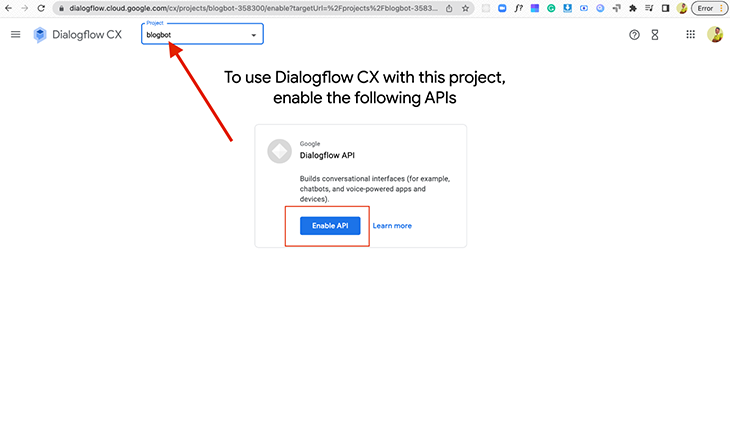
To make use of Dialogflow, we have to Enable Dialogflow API for our project. We can do that on the dashboard that pops up, similar to the below image:
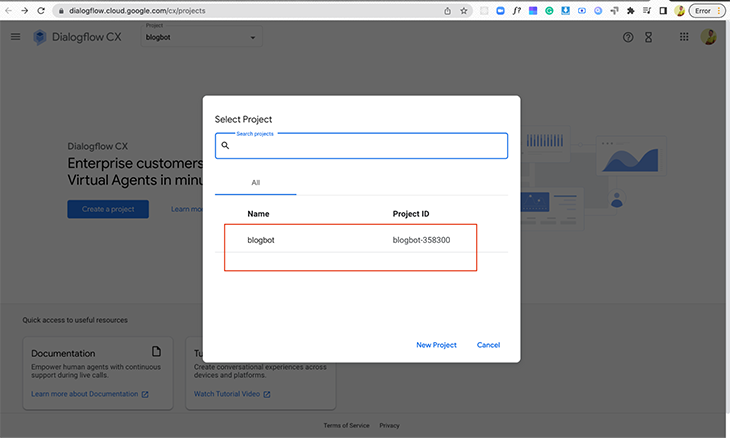
Select the project we created initially, and you’ll be presented with the below screen. Click on Enable API:
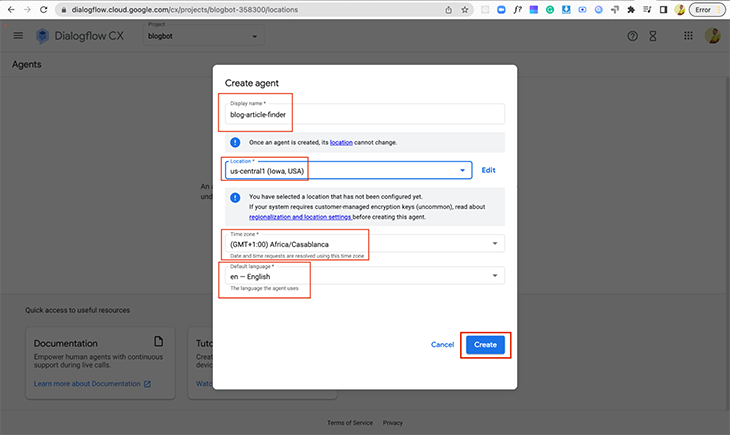
You’ll then be prompted with another screen asking to create an agent. Complete the form for the initial basic agent settings:
Set a display name
Leave location as the default:
us-central1 (Iowa, USA)Set your preferred time zone. I set mine to
(GMT+1:00) Africa/CasablancaLeave the language as the default or feel free to set your own
Click Create
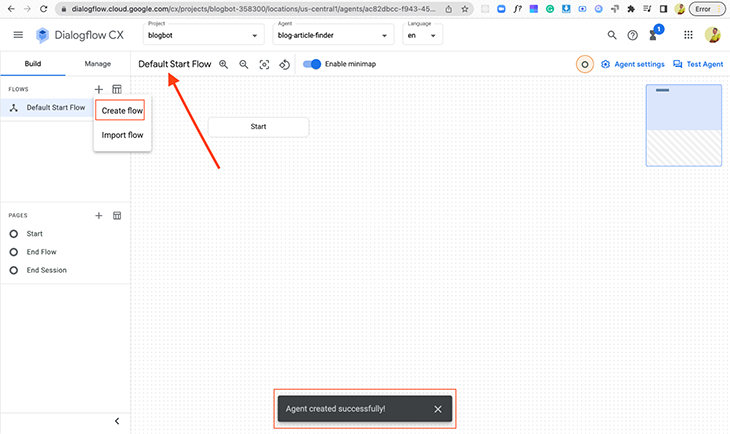
After our agent is created, we are presented with a dashboard called the “Default Start Flow.” A mini pop-up at the bottom of the dashboard tells us that our agent is successfully created:
What are flows in Dialogflow CX?
Flows are a new concept in Dialogflow CX. They enable us to create complex dialogs that involve a lot of topics.
The bot we are building will give us different articles, such as blog post articles categories, article suggestions, and most popular articles.
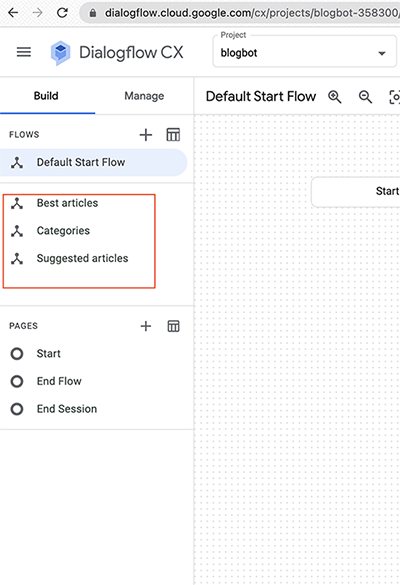
With this, we will have three conversation topics that we’ll break into three different flows:
Categories
Suggested articles
Best articles
Next, we’ll set up our flows.
Creating our flows
In the above image, you can see the + icon on the left sidebar. Click on Create flow and enter the name “Categories.” Hit the Enter key.
We have successfully created our first flow! Now, go ahead and do the same for “Suggested articles” and “Best articles.”
The Dialogflow Simulator
On the Dialogflow CX dashboard, we have a simulator. This allows us to simulate our bot and test our conversations.
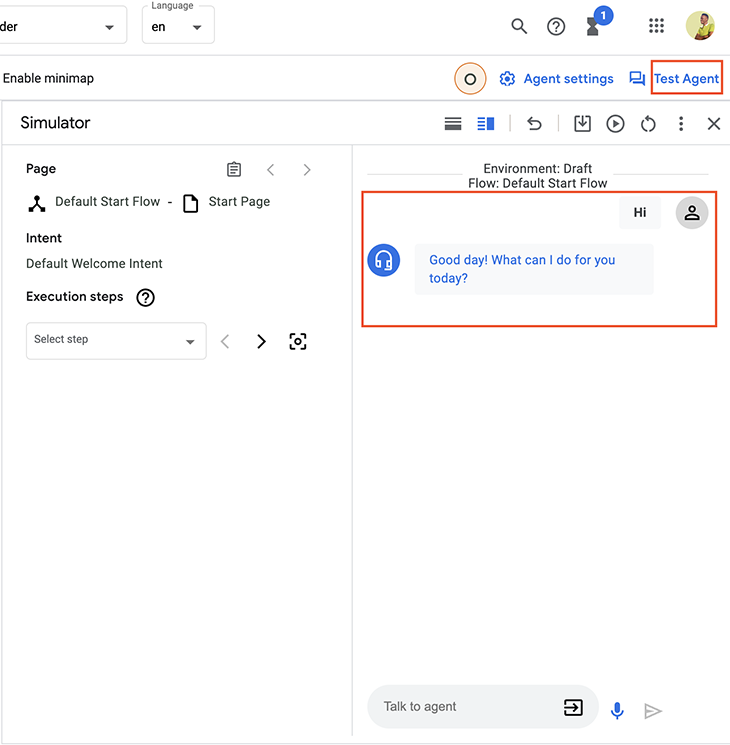
At the top right of our dashboard, click on Test Agent.
To quickly test our bot we can say Hi. Our virtual agent will respond with a default welcome message, just like the image below:
Let’s change our welcome text to something more personalized — something more friendly, welcoming, and fun.
On the left of your dashboard, click on Default Start Flow, then click on the Start Tree node to open the page.
N.B.*, on the **Pages section in the left sidebar, it automatically selects Start*
In Start, under Routes, click Default Welcome Intent. To the right, another panel will open, and in this panel look for the Fulfillment section and delete all the Agent says entries. Add our custom text below:
You are most welcome, I am Chinedu, a blog bot. I can do many things. You can read tech articles from many categories, get the best articles, and I can suggest great articles in case you don't have any in mind, I'm sure you'd love it! Let's get reading…
Next, we make some quick reply buttons similar to what we see on regular bots. We call them suggestion chips.
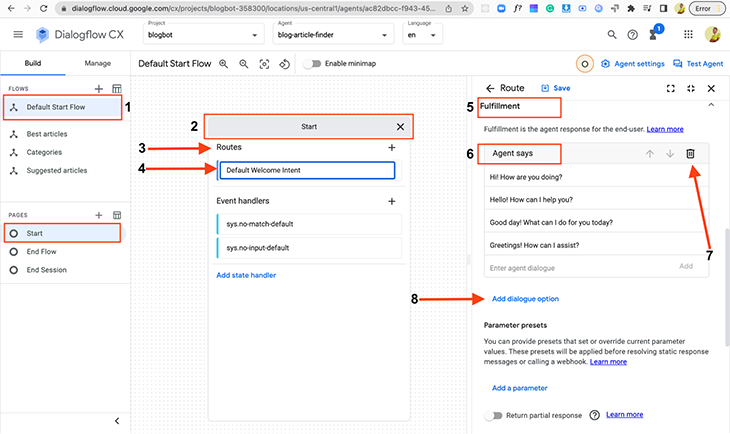
Under the Fulfillment, there is a link called Add dialogue options. Click on it, then click on Custom payload and paste in the below code snippet before hitting Save:
{
    "richContent": [
      [
        {
          "type": "chips",
          "options": [
            {
              "text": "Categories"
            },
            {
              "text": "Best articles"
            },
            {
              "text": "Suggested articles"
            }
          ]
        }
      ]
    ]
  }
Now let’s go ahead and test our welcome intent in the simulator:
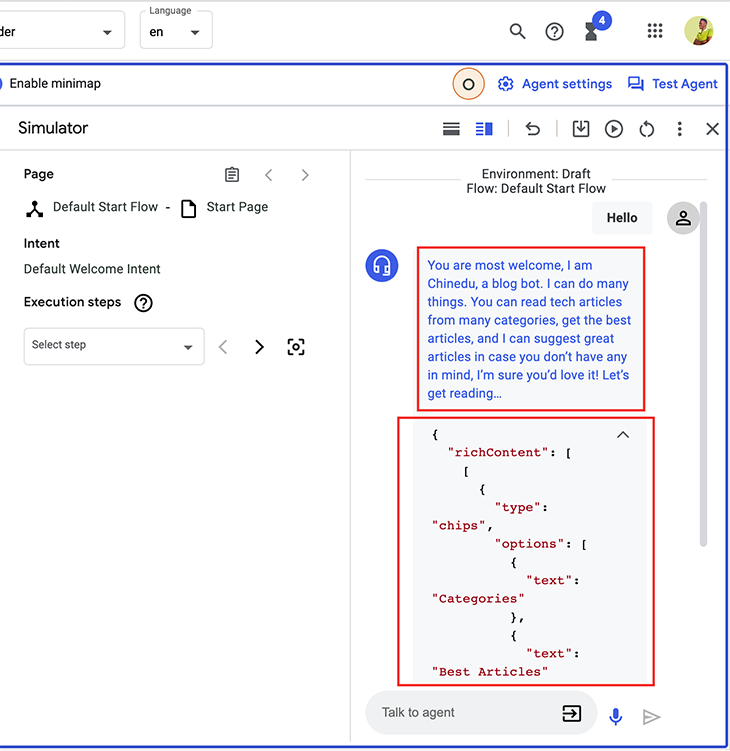
When we send Hi, we get our custom message. You may have noticed that we can’t view our chip. For us to be able to achieve that, we need integration. We’ll be using React for this, and we’ll set up our React app to integrate with our Dialogflow bot.
But before we do that, we need to enable a web integration as such:
In the left sidebar, click on Manage
Scroll down to Integrations
Select Dialogflow Messenger from the dashboard
Click on Connect
A pop-up will appear, click Enable
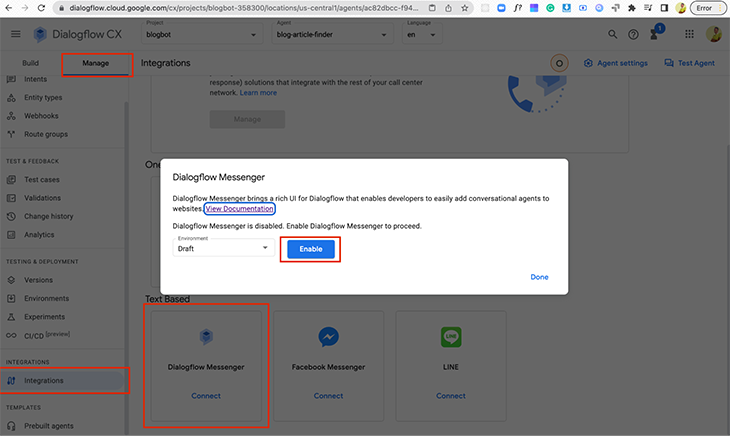
After this, another pop-up will be shown that contains the JavaScript code we need for the integration:
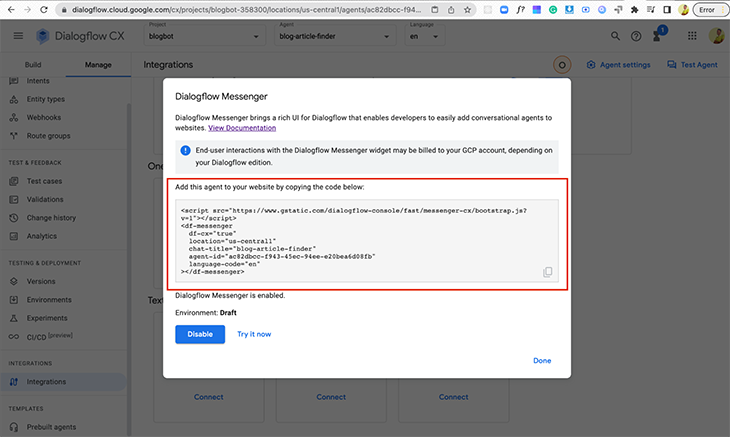
To do a quick demo, we can click on the Try it now button.
Setting up our React app
In your terminal, create a new React project by running the below code:
npx create-react-app blogbotapp
Next, cd into our application, open it with your favorite code editor and type run npm start.
Next, we add our code snippet to the body of our HTML file in the public folder within our React application:
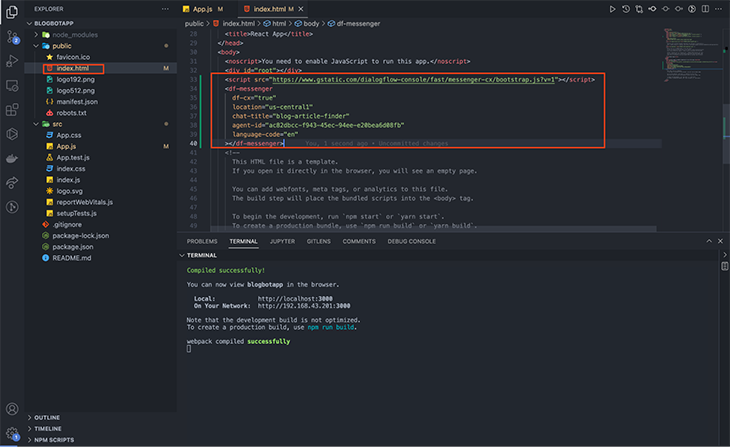
All set! With this, we have successfully set up our React app, and we can see that everything works well like in our simulator on the Dialogflow CX dashboard.
Let’s get back to configuring our bot and setting up our entities.
What are the three entity types?
Entities are used for identifying and extracting useful data from user input.
We will be creating our entities shortly, but Dialogflow provides ones that can be used to match dates, emails, colors, currency, phone numbers, addresses, etc.
There are three types of entities in Dialogflow:
System entities
Session entities
Developer entities
Let’s go ahead and create our custom entities for our category, best articles, and suggested articles options.
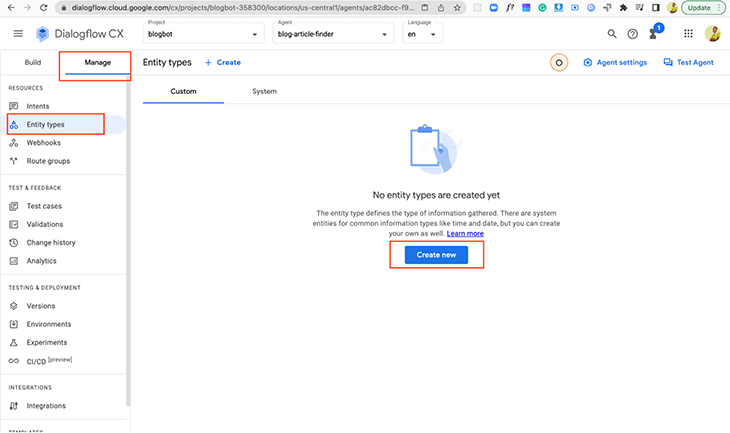
Entity for “Category”
First, click on Manage and then Entity types. If the dashboard opens up, click the button that says Create new.
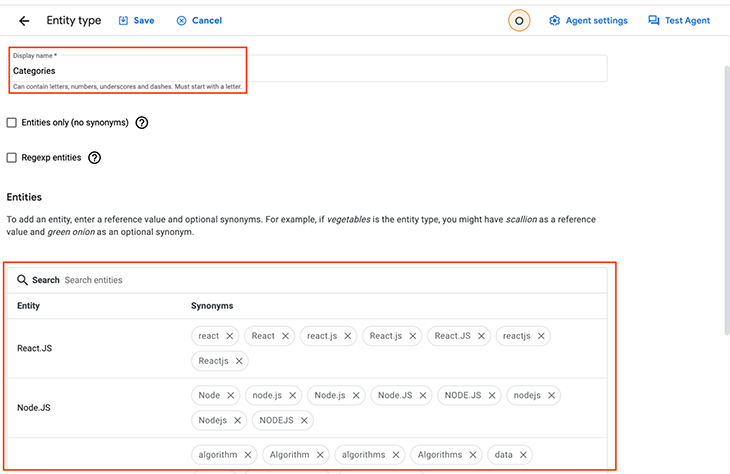
A dashboard will show up where you can enter the display name. In the table that shows the entity, enter the following entities and their synonyms:
React.js (with synonyms: react, React, React.js, reactjs, Reactjs, React.JS)
Node.js (with synonyms: Node,node.js, Node.js, Node.JS, NODE.JS, nodejs, Nodejs, NODEJS)
Data Structures and Algorithms (with synonyms: algorithms, Algorithms, algorithm, Algorithm, data, Data, data structures, Data structures, Data structures & Algorithms, DSA, structures, dsa, data structures & Algorithms, Data structures and Algorithms, data structures & algorithms)
After that, click on the Advanced settings dropdown, and check the Fuzzy matching and Redact in Log checkbox.
Fuzzy matching helps in the case where if we spell a name wrong, it can match it to the right entity.
Redact in log helps to correct the name in the log in a case where we spell them wrong.
After that, click Save and do the same for the other two entities.
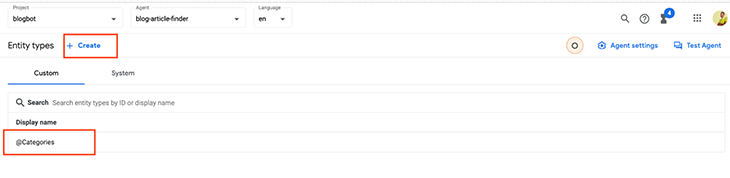
After saving our first entity, return to the dashboard and we can see our first entity, @Categories. To create a new entity, click + Create.
Entity for “Best articles”
JavaScript: How to implement a queue (with synonyms: Javascript queue, Javascript: How to implement a queue, queue, Queue, queues, Queues, QUEUES, QUEUE)
70+ JavaScript libraries (with synonyms: 70+ JavaScript library frameworks tools and plugins, plugins, PLUGINS, PLUGIN, Plugins, Plugin, tools, TOOLS, TOOL, Tools, Tool, tool, frameworks, FRAMEWORKS, FRAMEWORK, Frameworks, Framework, frameworks, framework. Library, libraries, javascript library)
Big O Notation (with synonyms: Big O, big O, Big O Notation, Notation, big o notation)
Entity for “Suggested articles”
Cache (with synonyms: Cache, Redis, CACHE, REDIS, cache, redis)
Nest.js vs. Loopback (with synonyms: Nestjs vs Loopback, NESTJS, nestjs, loopback, loopback4)
Next, we set up our intents.
What are intents?
In Dialogflow CX, intents contain the logic that detects what the user wants. They only contain training phrases and are therefore reusable.
N.B.*, According to the documentation, training phrases in intents make use of entities. This helps to get variable inputs, therefore it’s good practice to create entity types before creating intents*
Training phrases are example phrases of what the user might type or say. If the user input is similar to one of the defined phrases, Dialogflow matches the intent.
Also, we don’t need to match everything because Dialogflow has an inbuilt machine learning functionality that expands our list with other similar phrases.
Intents use three different prefixes:
Redirect (for intents that use NLU to fetch a page)
Confirm/decline (for intents that are yes or no training phrases)
Supp (in a case where the intent is an additional question that can come back anytime in the flow)
How do we create intents?
To create intents, click on Manage and then Intents. At the top of the dashboard, click on the + Create button.
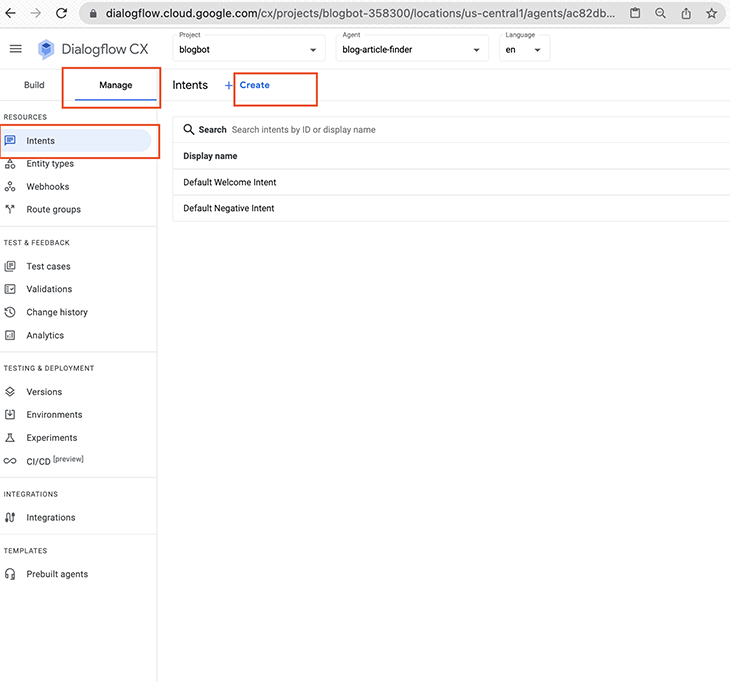
I’ll go ahead and create the intents for the @Catergories entity, then I will give phrases for the other entities to enable you to do that on your own.
You can add your imagination for more training phrases. It’s advisable to have more than 10 training phrases for each intent to cover the different ways the user might trigger it.
In the input box that says Display name, input redirect.categories.overview.
Do the same for the description:
Categories.description: The types of articles we have.
After that, we scroll down and create the training phrases:
Can I see a list of all the available categories of articles?What articles can I read?I would like to see the categories of articles availableWhich categories of tech articles do you haveWhich categories are currently availableWhich categoryWhich articlesWhat articles can I read?
After all, this is done, click on Save.
Now, go ahead and create new intents.
Pages and state handlers
Dialogflow CX conversations can be described as finite-state automation.
Let me explain with an example…
Take an automated teller machine (ATM). The ATM has the following states: waiting for credit/debit cards, inputting your pin/passcode, selecting your bank, selecting the withdrawal amount, giving money, and when a certain input is provided by the user, moving between different states.
Slotting in your card will change the state of the ATM Machine from waiting for credit/debit cards to inputting your pin/passcode.
In Dialogflow CX virtual agent, we use pages to model these states.
There are three types of routes that control the conversation state by handling the transition between pages:
Condition routes: changing the page occurs based on a certain condition stored in the session
Intent routes: changing the page occurs based on what the user says/wants
Event handlers: changing the page occurs when a certain event should be handled, (for example, handling no match, handling no input)
The response sent back to the user is known as the conversation utterances. And they are defined by fulfillment which can be of two types:
Dynamic fulfillment: when a fulfillment webhook is called to get a dynamic response
Static fulfillment: when a static fulfillment response is provided
We won’t be going into creating dynamic fulfillment. For our blog bots, we will focus on static fulfillment responses.
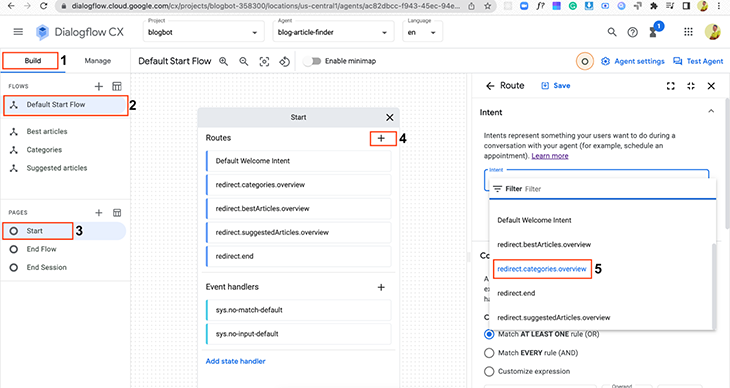
We’ll create the pages in the default start flow:
First click Build
Click on Default Start Flow
Click the Start under PAGES in the left sidebar section
Next, click the + icon next to Routes
Click on the Intents input dropdown
Add
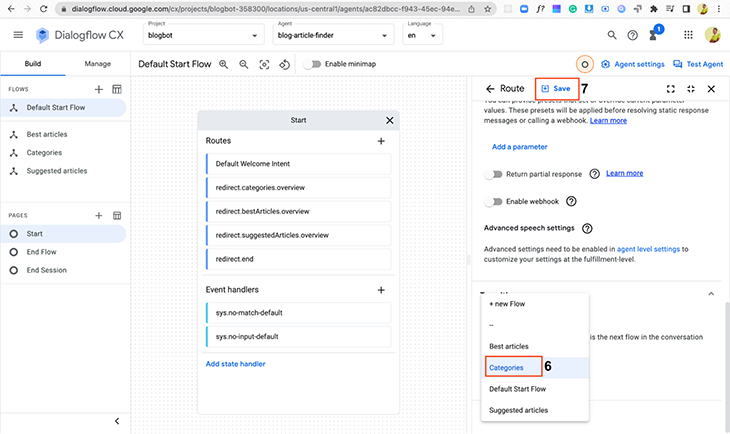
redirect.categories.overviewScroll down to Transition and select the Categories flow that we created initially
Finally, hit Save
We repeat the same process for
redirect.bestArticles.overview,redirect.reactjs,redirect.nodejs,redirect.datastructures-and-algorithims,redirect.suggestedArticles.overview, andredirect.end
You might have noticed End Session and Flow. End Flow closes the flow and jumps back to the last active flow, while End Session closes the full chat session.
Next, we create pages for flows, starting with Category. The below chat transcript is for the “Category” flow:
Message from user: "Hello"

Bot response: "You are most welcome, I am Chinedu, a certified comrade and a blog bot. I can do many things. You can read tech articles from many categories, get the best articles, and I can suggest great articles in case you don't have any in mind, I'm sure you'd love it! Let's get reading…"

Message from user: "Can I see a list of all the available categories of articles?"

Bot response: "We have the following categories you could read from: React.js, Node.js, Data Structures and Algorithms.Which categories would you love to read from?"

Message from user: "React.js"

Bot response: "Awesome! Everyone loves React.js"
Let’s connect our pages:
First click on Build
Click on Categories
Click the Start under PAGES
Next, click the + icon next Routes
Click on the Intents input dropdown
Add
redirect.categories.overviewScroll down to Transition, select the Page and choose + New page.
Use the page name:
Category OverviewFinally, hit Save
We repeat the same process for the
redirect.bestArticles.overview,redirect.reactjs,redirect.nodejs,redirect.datastructures-and-algorithims, andredirect.suggestedArticles.overview
We’ll continue adding static fulfilments:
In Categories, click on Category Overview
Click on Edit fulfillment under the Entry fulfillment section
Paste the static fulfillment message:
We have the following categories you could read from: React.js, Node.js, Data Structures and Algorithms.Click Save
We do the same thing for the “Best articles” overview and “Suggested articles” overview:
Do you want to read some of our best articles?You don't have anything in mind to read? I could suggest articles for you to read.
Let’s look at the parameters and what they are used for.
Parameters are used to capture values that we expect to be supplied by the user in a session.
Each parameter has an entity and name.
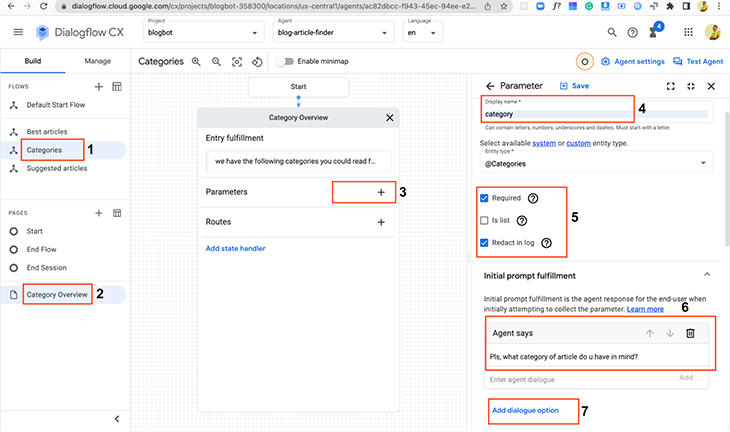
Let’s create parameters for the “Category Overview” page:
Click the Category Overview page
Click the + in the Parameter block. Add the category parameter
Enter a display name:
categorySelect an entity type:
@CategoryCheck the box for Required
Check the box for Redact in Log
If the virtual agent hasn’t collected the category parameter, we could send the user a response:
Please, what category of article do you have in mind?
Next, let’s add a dialogue option that’ll provide rich suggestions.
Click Add dialogue option and add the below JSON code:
{
  "richContent": [
    [
      {
        "options": [
          {
            "text": "React.js"
          },
          {
            "text": "Node.js"
          },
          {
            "text": "Data Structures and Algorithms"
          }
        ],
        "type": "chips"
      }
    ]
  ]
}
We can handle different fallback fulfillment prompts. We do this with parameter event handlers. There are various inbuilt event handlers to choose from, such as no-match default and no-input default, which we are going to be using.
On the same page, scroll down to the Event handlers section
Click on Add event handler
Select the event:
No-match defaultThen paste in the following static fulfillment text:
I could not get that, can you specify the category you need? You can choose React.js, Node.js, and Data Structures and Algorithms. What category of articles would you like to read?Click Save
Click on Add event handler
Select the event:
No-input defaultThen paste in the static message:
I am sorry, I could not get the category you need. You can choose React.js, Node.js, and Data Structures and Algorithms. What category of articles would you like to read?Click Save
Page condition routes
Parameters tend to be very powerful when combined with a page conditional route. When a condition evaluates to true, the respective page route is called.
For our blog bot, we collect a sequence of parameters, hence we will create a form to check if our condition is met.
Creating the conditional routes on the “Category Overview” page.
Here, we are creating a conditional route that will transition to the next page once the artist is known.
After we have selected the category we want, our bot does something really simple. It sends us a nice message “React.js, nice choice.”
In the “Best articles” flow, we click bestArticle, hit the + beside the route, and paste the following into the custom payload:
{
  "richContent": [
    [
      {
        "options": [
          {
            "link": "https://blog.logrocket.com/add-redis-cache-nestjs-app/",
            "text": "Redis in Nestjs"
          },
          {
            "link": "https://blog.logrocket.com/build-strongly-typed-polymorphic-components-react-typescript/",
            "text": "React.js polymorphic component"
          }
        ],
        "type": "chips"
      }
    ]
  ]
}
Change the intent to the “Best articles” page that we created initially and set the condition to At least match one rule.
After that, we want to create another route where we end the session.
We do the same thing for the suggested article. Creating a new intent called “Suggested articles” while pasting the below payload and creating the end session route:
{
  "richContent": [
    [
      {
        "options": [
          {
            "link": "https://www.ddevguys.com/bigo-notation-summarized",
            "text": "Big O Notation Summarized"
          },
          {
            "link": "https://www.ddevguys.com/javascript-how-to-implement-the-linked-list-data-structure-part3",
            "text": "Linked-list"
          },          {
            "link": "https://www.ddevguys.com/javascript-how-to-implement-a-queue",
            "text": "Implement a queue."
          }
        ],
        "type": "chips"
      }
    ]
  ]
}
With this, we have been able to build a very simple bot that sends us a cool message after we have chosen a category, sends us our best articles, and also suggests articles to us.
Phew…
Conclusion
We went over the process of building a chatbot using Dialogflow CX and React. This app and chatbot could be improved in a lot of ways depending on your project requirement and the goal you want to achieve.
This was just a basic overview of what could and can be done with Dialogflow CX and how powerful it is.
If you got to this point, you are indeed a legend, because this was a long one. And I really appreciate you for taking the time to read this.
Do leave feedback if you enjoyed it! Reach out on Twitter if you want to dive really deep into Dialogflow CX, I’d love to hear from you all.
Until then, keep coding. Much love.